Showing posts with label dresses. Show all posts

Apr 6, 2013

What have I been up to?

Hello again!  A lot has happened since I blogged last.

We've moved house!
I've changed jobs!
Katherine has started school!
Plus I have done a fair bit of sewing.

I never intended to neglect my blog for so long.  At first we were busy with the move, and setting up the sewing room was fairly low on my list of priorities.  And then I was busy sewing Christmas gifts, and I didn't really have time to blog.  I still followed other people's blogs and saw people doing things that I just didn't have the time to do - seriously, the effort some people go to is amazing.  Sewing and blogging isn't my life, it's just something I do when I get time, and I kind of felt like maybe I couldn't keep up.  But I've decided that I don't need my blog to be what other people's blogs are.  It's just somewhere where I want to share my ideas and my projects.  I love searching the web for ideas and it's kind of nice to think that maybe someone will stumble across a project of mine one day and that will help inspire them to create their next project.

On that note, here are a few things I've been creating these past six months or so.

For the girls:


Dresses for the girls to wear to their Aunt's wedding.  These were based on the Ottobre Rosy Posy dress that I love, but I left off the sleeves and added a peter pan collar.  Oh, and a tie at the back.


I picked up a cute fat quarter pack at Spotlight one day and made the girls some little skirts, with little twill ribbon belts.


For the home:


The girls helped me make this bunting to help dress up their new room.  It was my first attempt at making bunting and I really love how it has turned out.  It was also a great way to use up some scraps I had lying around.


These cushions for the girls room, to sort-of-match the bunting.  My mum helped me to make these when she visited us for Easter :)  Thanks mum!


These button initials that the girls also helped me with.  I got the idea from something I saw on Pinterest.  We used craft glue and cardstock and popped them in some frames I had lying around.


Following up on the cushions I made for the girls room, I made these ones to add some colour to our lounge room.

For me:


I don't sew for myself much, but I recently bought a dress form and have been having a go at making more things for myself.  This skirt was made out of a remnant of funky-patterned jersey I picked up at Spotlight for $2!  All I did was overlocked it to some wide elastic.  It took me all of about 15 minutes to make and I love it!


This dress is New Look pattern 6070.  I really like how this turned out, and I think I got a much better fit by using the dress form.  Plus, I didn't have to constantly try it on throughout the process, or try and pin behind my back!  Bonus!


The pattern didn't call for a lining but I added one anyway.  This satin was left over from the little lace dress I made Katherine for the wedding, and I had just enough!

Now that I'm all caught up, I'm going to try and blog more regularly, but even if I don't, I will be back.... eventually!


Oct 16, 2012

Here fishy, fishy...

I usually sew for Katherine, as she is usually the one in need of new clothes, and Ellie has so many of her big sister's old things that she doesn't really need anything extra.  Katherine probably doesn't need half of the stuff I make her either, but that's neither here nor there.  Anyway, today I was going through my fabric cupboard - sometimes I like to do this when I don't really know what I want to make next - and I came across this fish fabric that I bought at Spotlight a while back.  I don't even really know why I bought it, it was definitely an impulse buy, and I didn't really have any particular project in mind for it.  But today I really wanted to turn it into something.  First of all I was going to make a skirt, but then Ellie said she wanted a dress.  I thought I might make a singlet-style bodice with little bias straps that tie up at the shoulders.  But then Sensible Mummy decided it would be better to make it sun-safe.  So in the end I churned out another Rosy Posy dress (I just can't help myself).


There wasn't enough fishy fabric to make the whole dress (I only had half a metre), so I made the bodice out of white poplin and just used the fish fabric for the skirt and sleeves.  I was under strict orders to save enough fabric to make a matching dress for dolly as well!  


I think Ellie enjoyed having a dress made just for her - she was much more enthusiastic about trying it on at fitting time than her big sis, and she loved having her photo taken.  I did have some trouble getting her to stay still though, she wanted to run and twirl and race over to me to see the photo on the camera before I'd even had a chance to take the shot.


As always, I put buttons down the back instead of a zipper, plus I lined the bodice, but not the sleeves or skirt.


The dress was a big success and she wore it all day!   


Oct 4, 2012

Little Lace Dress

I've been seeing lace everywhere lately.  Part of the whole "everything old is new again" movement, or - as I've seen it referred to recently - "old lady chic." I saw a photo of a beautiful little girls lace dress on one of my favourite blogs (No Big Dill - you can see the blog post here) a while back  and thought to myself "I have to make this!" Plus there have been so many beautiful dresses I have spied while out shopping that I thought I would just have to add some lovely lace to Katherine's summer wardrobe.


So anyway, here is what I came up with.  I used my favourite A-line dress pattern, cut front and back panels out of lace and lining (which was just some white cotton poplin), and a hem panel out of the lining fabric too, to sit on the front of the dress.  I also had to make up some little sleeves as the dress pattern I was using was sleeveless.  The sleeves aren't lined, just finished with a little bit of binding on the sleeve hems.


Katherine likes the dress and hopefully will get a bit of wear out of it.  I've never been afraid to dress my girls in white, for fear they will get their clothes dirty.  That's what Napisan is for, right?  Plus look at that face.  This girl would never get up to no good and ruin her clothes, would she?  Surely not!  (Don't you believe that for a second!)


The dress has buttons down the back and I even made a coordinating little hair clip.  The middle button on the hair clip is from my Nanna's button stash, to complete the pretty vintage look.


Sep 9, 2012

Nautical but nice

I've been eyeing the Sail away school dress tute off for a while, and last night I finally sat down with my just-arrived Sarah Jane Out to Sea fabric and got to work!


I didn't have any old shirts to upcycle, so I made my own shirt - using the same basic method of cutting around a tee.  I just made sure to add an extra couple of inches to the center of the front panels so that I could make a placket there.

She told me she was doing some sort of pirate dance here!  
Apparently the striped shirt is a "pirate shirt."
I also did a couple of little things differently.  I added some darts at the back of the shirt as little miss has her mother's sway back (poor thing, welcome to a lifetime of ill-fitting shirts!), and I attached the shirt bindings and skirt waistband a little differently to give a neater finish as I wasn't keen on the exposed seams.


The buttons on the skirt are some cute little metallic shank buttons that I was recently given from my Grandma's stash.  I remember fossicking through Grandma's button tin when I was my girls age.  I love that I can use these on their clothes now.

Sep 1, 2012

Spot the obsession...


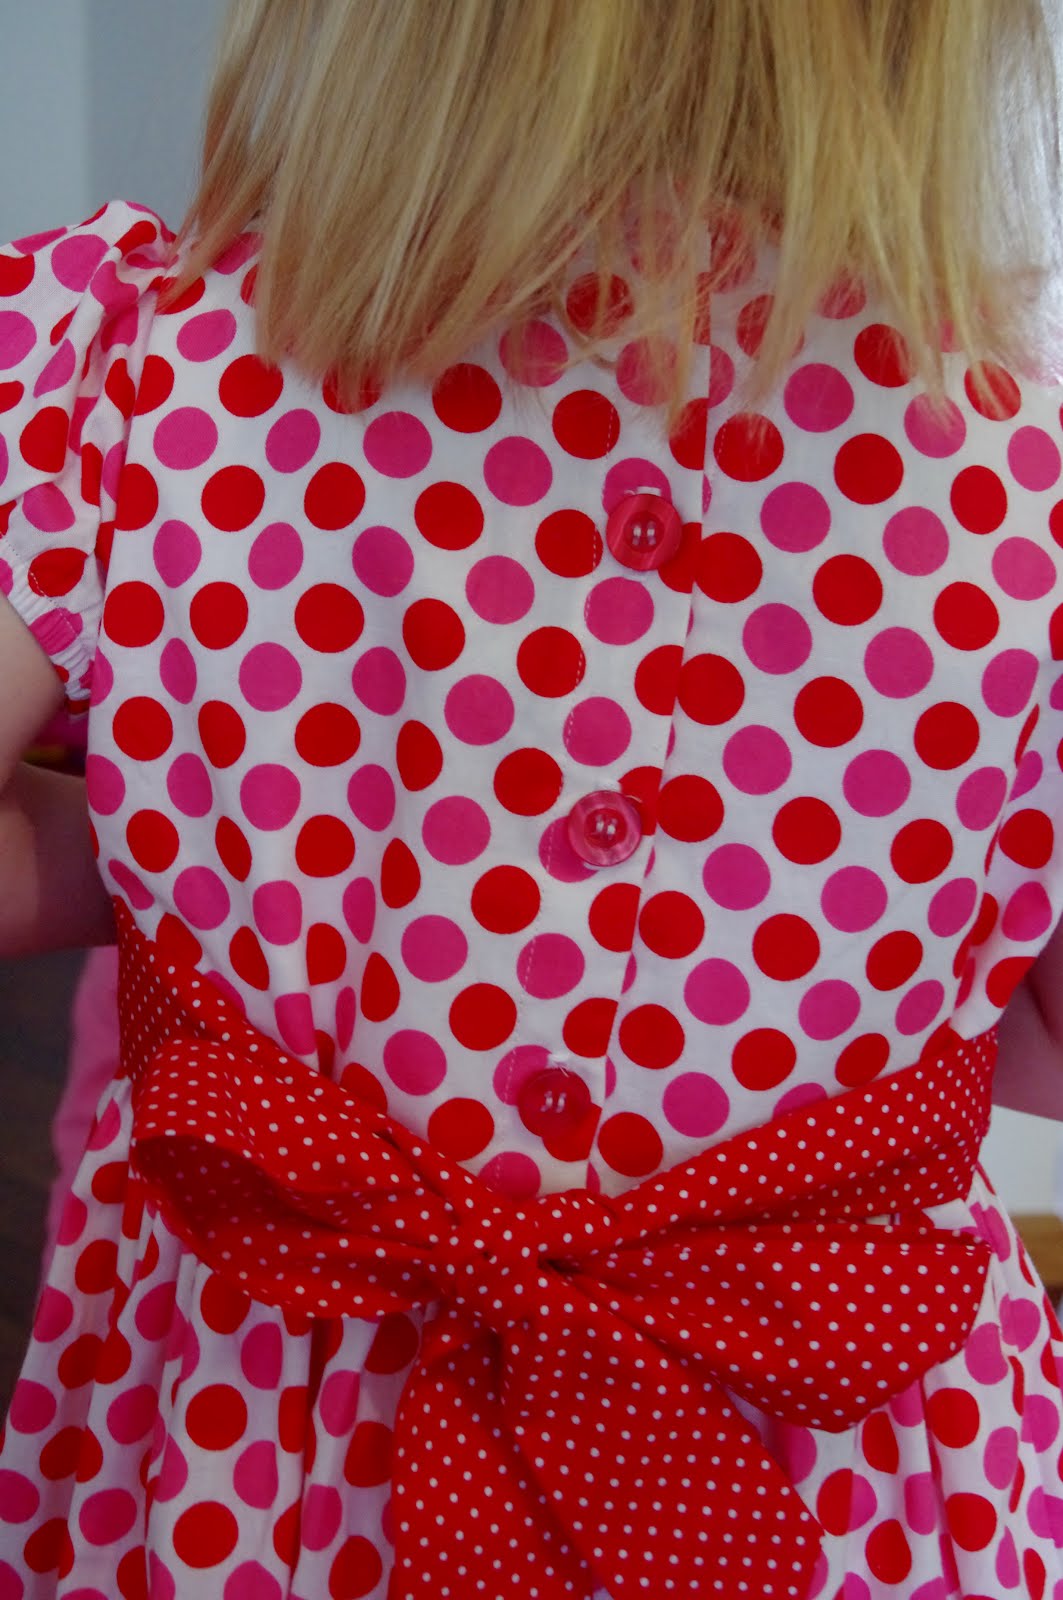
So this is the third and last spotty dress I will make for Katherine this year... I think.  She actually chose this fabric on a recent trip to Spotlight, and I knew it was going to be a Summer dress of some description, but I wasn't sure what I was actually going to do with it.  Well, I've been seeing all these Peter Pan collars around the place and then I came across this super sweet tutorial on Craftiness is Not Optional that shows you how to draft your own collar using the neckline of the top.  Oh yeah, that dress is totally on my to-do list now as well, I just won't be making it out of spots!


So I used the Rosy Posy dress pattern again - you really can't go past it for a fitted bodice and lovely full skirt.  I made the bodice a little leaner and the neckline a little higher at the front.  I also left off the sleeves, but as the bodice is fully lined in my version I didn't need to worry about bias binding or anything fiddly like that.  I used the method outlined in the tutorial to create and attach the collar.


Am I the only one who buys those cheap bags of "craft buttons" which are all mismatched singles and factory seconds? Sometimes buttons can be so expensive so I try and use up my mismatched buttons wherever I can! This dress was perfect to use mismatched buttons on, because of the different coloured pink circles. Even my husband said, when I showed him the dress, "I like how you've done different coloured buttons to match the spots on the dress." You can tell he has been spending too much time with me!


I have been trying to take a bit more care with my sewing and really concentrate on matching patterns up - I think I almost managed to get it right here too.

Aug 27, 2012

A spot of sewing

I have been doing a spot of sewing lately, just a little bit, in preparation for the warm weather that will hopefully be coming our way soon. I was also lucky enough to have a week off work last week, so I managed to tick a few things off my to-do list.  My plan is to try to ignore the temptation of all the cute clothes in the shops (and there are so many!) and try to make most of the girl's wardrobes this season.  We'll see....

I bought this red and pink spot fabric a while ago with the intention of making a dress for Katherine.  Well, I had actually forgotten I had it stashed away, but I came across it while I was searching for some green polka dot fabric I was sure I had (which I couldn't find anywhere).  This prompted me to admit to my husband that maybe I did have too much fabric, since I am always coming across things I had forgotten I had.  I'm pretty sure he realised I wasn't being serious.  You can never have too much fabric, after all.  But anyway, I dragged this fabric out of the cupboard and decided to finally make that dress.


I used the Rosy Posy pattern from Ottobre 3/2011.  For a while I was tossing up whether to make up the Oliver & S Family Reunion Dress instead, since I haven't made one of those yet, but in the end I went with the Rosy Posy as I've made it a few times now and it always gives such a lovely result.  The only thing I like to do differently is to fully line the bodice (and sometimes the skirt, but not this time), and use buttons down the back of the bodice instead of a zip.  With this particular dress I also added a gathered sash and tie, which I sewed into the bodice/skirt seam at the front, rather than use a detachable ribbon tie.


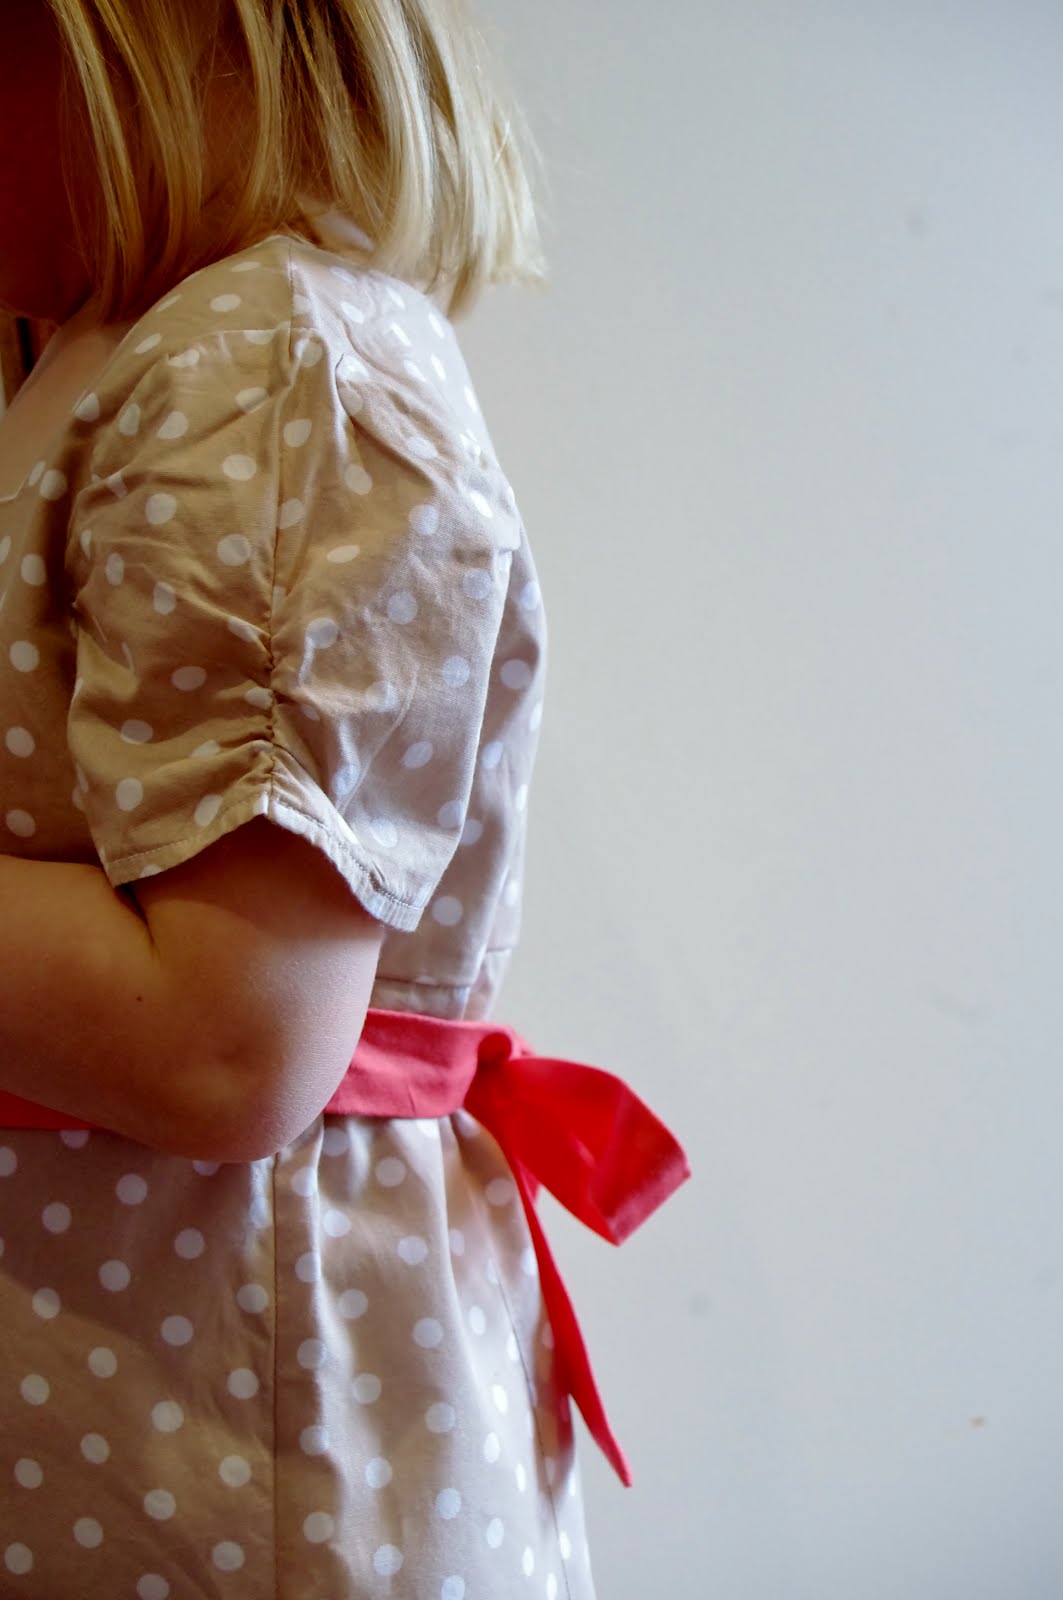
Continuing with the spotty theme, I decided to make a beige and white polka-dot dress as well.  I was inspired by a dress I saw somewhere but unfortunately I can't remember where.  I actually thought I first saw it at Target but when I went back to have a better look they didn't have it.  So I don't know if they sold out of them or whether I saw it somewhere else.

The pattern I used was Simplicity 2683, and I made view A.  It was the first time I've used the pattern, even though I've had it for a while.  I made it up in the size 3 but with an extra half inch of length in the bodice and an extra inch or so at the hem, for my bean-pole 4 1/2 year old.


At first I was worried about the sleeves as they kind of look funny on the pattern cover.  I was almost going to make up some Rosy Posy style elasticised sleeves instead, but I stuck with the original design and I am glad I did, they are lovely.  The only thing I did differently was not line the sleeves.  I just overlocked the sleeve edge and turned it up to hem it instead.  I figured it would be cooler for summer this way, plus I didn't want to fiddle around with a lining.


Excuse the wrinkled sleeve, I haven't quite figured out how to iron something that small with that many gathers!

The dress has buttons down the back (yes, zipper phobia strikes again!) and a salmon coloured sash and tie.  I really like this dress, but the fit is snug and I am hoping she won't grow out of it by summer.  Although at the moment she only seems to be growing up so maybe it won't be an issue.

I have a couple more dresses I want to make before I'm done yet.  How many dresses should a little girl have?  Is there a limit? Or is is like fabric, and there is no such thing too many?


Aug 22, 2012

One scoop or two?

A few weeks (months?) ago I bought some fabric with the intention of making each of my girls an Oliver+S Ice cream dress. I was inspired by all of the colour block dresses that had been popping up around the place, like here, and here, and here. Oh, and there was also the one I made for my sister a little while back too.

Anyway, I enlisted Katherine's help to choose some colours and whaddya know, she chose pink for herself and blue for Ellie. The girls helped me layer up the colours and cut out the pattern - they loved it!  And they really like their finished dresses.

Katherine's pink dress was made up in size 5, but with some of the fullness taken out of the bodice (I was working with fat quarters here, so didn't have a lot of width to start with - plus she is a string bean!).  The heights of each the layers aren't cut exactly according to the pattern either, because I didn't have a whole lot of each colour, I had to use more of some fabrics and less of others.  And I also just made them with a regular old boring hem, because I didn't have enough fabric to make the double-layer hem that the pattern calls for.  Oops! 


Ellie's was the size 2T. Is the neck opening supposed to run small on these dresses? This one only just fits over her (small-to-average sized) head.


Now I wouldn't say the Ice cream dress is my favourite Oliver+S pattern, but I am happy with these dresses and I'm glad I can tick them off the to-do list.  The most important thing is that the girls are also happy with them - I'm guessing they'll get a lot of wear once the weather warms up a bit more for us (do you hear that, Spring?  You'd better hurry up and get here!).

Jul 28, 2012

For my sister...

I caught up with my sister today, at my niece's birthday party - not my sister's daughter, but my sister-in-law's daughter.  Because our kids are all around the same age, we often all catch up together, like one big happy family.  Anyway, my sister's birthday is next weekend and because I wasn't sure if I would see her for her actual birthday, I brought along the trench coat I had made for her, as well as a dress I'd made through the week.

Are you going to blog me?  She asked as I snapped some quick photos on my phone...  well, yes, yes I am.


The sleeves came up a bit short on the jacket, but I was expecting that.  In hindsight I really should have left myself some "wiggle room" there.  My sister is small pretty much everywhere, except for the length of her arms.  Because I don't really have anything left in the sleeve hem, I'm thinking of adding an extra strip of fabric at the ends and making a little cuff thingy to give them some more length - it really only needs another inch or two.

During the week I also tested out my Oliver + S Ice Cream Dress pattern.  I was inspired by some colour block dresses I'd seen, like the ones here and here, and also this adult version of the Ice Cream Dress.  I already knew from my sister's measurements that the size 12 would (should) fit, so I picked up some brightly coloured polin and got to work.

In the back of my mind there was the thought that maybe the dress would fit me, but being a redhead, orange is not even close to my colour.  Plus I have curves, which is a real pain when trying to sew for myself.  It's pretty much the reason I don't do it.  And the dress didn't fit me, so my sister has scored it for her summer wardrobe.  That's if she is game enough to wear it - it is pretty bright.


Despite adding an extra half inch or to to the bottom of the top panel, it is still just a tad tight around the arms.  I've been trying to think about how I could add some room in there without unpicking the whole top section.  It fits as it is, but it could probably be a little more comfortable.  Plus if I was to make one again, I would make the neck just a teensy bit wider.  Other than that I think it looks great.  

The most impressive part for my sister was that I covered the button on the back with the same fabric as the dress.  Well, as they say, it's the little things that matter most!  

Love you sis!

Jul 21, 2012

Frilled to bits

Months ago, I saw this tute over at Sewing in No Mans Land. I actually saw the tute and made the dress that same night, but because the weather here has been a bit chilly to be out in a sleeveless dress, it has remained unblogged - until now.


I made the dress out of some pink cotton interlock and some scraps of dusty rose coloured satin I'd had for years - it was actually an extra metre of fabric I'd bought when I had my bridesmaids dresses made so that I could make some matching ties for the groomsmen. There wasn't really enough of it left to do anything with, but I kept it in my scrap basket all that time anyway, because I am a scrap hoarder. The finished dress was pretty heavy because of the weight of the fabric, and I could see it turning out better in something lighter to be honest, but it was still a fun project. I think my favourite part was piecing together all the ruffles on the front and back panels of the dress. Not having to sew any hems was pretty good as well!


Look at those ruffles - love them!

Jul 8, 2012

Tianna Dresses

A while ago I purchased some pdf patterns from the Lily Bird Studio on Etsy.  They have some really cute things for girls and boys.  I liked that their patterns looked simple and sweet - nothing too fussy or cluttered, just clean lines and lovely little details.  Then this week just gone, I managed to make not one, but two of their Tianna Dresses, and I have to say I will definitely be buying and making more patterns from this shop.

The dresses came together really quickly - I made Ellie's in an afternoon and Katherine's I managed to make in under 2 hours, including the cutting out.  Most importantly, the girls actually like them - Ellie has worn hers twice this week, and Katherine wore hers yesterday.  Just after I had sewn it together, but before I had put the buttons on, Katherine came into the sewing room and saw it hanging up.  She clutched it to her chest and danced around the room with it.  I had to gently pry it from her fingers and explain I still had pins in it!  Haha!


The sizing was pretty spot on for my skinny minnies, which was refreshing as I didn't need to make any adjustments at all, really.  I made a size 2 and a size 4. If you have average-to-larger sized children, I would recommend going up a size.  Katherine's dress I made out of some brushed cotton checks (no, it's not just for old men's shirts :P).  I skipped the buttons down the front on Katherine's and just put a pretty ribbon on instead.


Ellie's was made out of some super cute baby elephant cordoroy, with quilting cotton for the lining and trim.  Sorry about the blurry photographs - it is so hard to keep this girl still! 


I thought Ellie's needed something extra, so I cut up an old yellow singlet of mine and made some little leggings using this tutorial from Make it and Love it, made even easier by the fact that I kept the original hem from the singlet so I didn't even have to hem them!  {Future idea - use an old lace-trimmed singlet to make lace-hemmed leggings!}  I added some little ruffles at the ankle, in the same fabric as the trim and lining of the dress.  Also, I swear the legs on the leggings are the same length!  The left leg must have been scrunched up a bit more when I took these photos.


I really like the way this outfit looks, and have resolved to make more outfits as opposed to just pieces here and there.